Axes are one of the most important tools that you can have in the wild, but after a while they get dull and if you’re not prepared you could end up with a blunt axe that isn’t chopping nearly as good as it should. Knowing how to sharpen an axe without tools is an important skill to have.
These are 12 ways that you can sharpen an axe without tools:
- Use a Multi-tool
- Base of a Ceramic Cup
- Sharpen it on a Rock
- Sharpen it on Concrete
- Sharpen it on a Car Window
- Use a Glass Bottle
- Emery Board
- Spine of a Knife
- Use a Shovel
- Back of Another Axe
- Strop it with a Leather Belt
- Improvised Sharpening Stone
Keep reading to learn the best ways to sharpen that dull axe!
How to Sharpen an Axe Without Tools
These methods will work with any kind of axe, tomahawk or hatchet. From here on out when I say axe I mean any of these three tools. Most of these techniques will work for just about any knife, or other sharp instrument.
Before you start using any of these techniques, you should decide if it’s really worth potentially ruining your edge or not. Some of these are almost as good as having a real sharpening stone, but others can cause you to have to do a lot of work when you finally get the proper equipment to sharpen your axe.
How to Sharpen an Axe
Just because we don’t have any tools to sharpen our axe, doesn’t mean that we aren’t going to do our best to get it get the edge into a suitable working condition. The main thing that will get your axe sharp and into cutting shape is getting the angle correct and keeping it as uniform as possible.
Safety Gear
Since we’re sharpening an axe on whatever we have available, I’m going to assume that you may not have access to every piece of safety gear that you should have. If you have access to them, use them, if not, just know that you need to protect your eyes, hands, and fingers when you’re sharpening your axe.
Safety Glasses – If you have safety glasses then you should wear them while sharpening your axe. Even your prescription glasses or sunglasses are better than nothing.
Gloves – A good pair of leather gloves are always a good idea when you set out to sharpen an axe. It not only prevents you from cutting your hands on the blade, it also keeps the instrument that you’re using to sharpen the axe from coming in contact with your hands and fingers which can be just as bad or worse than the blade itself.
Clamp or Vise – A clamp or vise makes getting a good edge on your axe much easier and it lets you get the angle of the blade just right without having to balance the axe and sharpen it at the same time. You can even improvise a clamp with rocks, wood or ratchet straps if you’re out in the woods away from a workbench.
What Angle Do You Sharpen an Axe to?
When you sharpen an axe, you need to pay attention to the angle of the bevel at the blade (the bit) end. An axe should not be a consistent wedge shape. Ideally, it will have a convex grind.
Most axes should have a 30 – 40 degree angle at the very end of the blade and gradually move toward a 15 – 20 degree angle about 1/2 inch up. This slightly bulging shape is known as a convex grind.
It’s a stronger grind than other ways of sharpening the blade and is great for holding an edge on an axe that’s going to be slammed into relatively hard material like wood over and over again. A convex grind also good for an axe because it helps separate the wood as the axe passes through it and prevents the axe from binding in the wood that it’s cutting.
How Sharp Should an Axe Be
There seems to be a myth floating around out there that you don’t want to have your axe as sharp as it can be. An axe should be as sharp as you can get it!
Sharp axes make the work of cutting through wood or splitting logs much easier. Besides making the work easier, a sharp axe is also way safer than a dull axe.
Dull axes have a tendency to bind in wood, bounce off their targets and land glancing blows. All of these make using a dull axe much more dangerous than a sharp axe.
Should an Axe be Razor Sharp?
This question comes up over and over so I feel like I need to stress it one more time. Every bladed tool that you own should be as sharp as you can get it. This goes for axes as well.
Sharpening an Axe with the Proper Tools
I’m going to cover how to sharpen an axe with the proper tools first because it will help you to understand what your goal is when you’re using an improved technique. It’ll help you get your axe back to a perfect edge once you get it home and can use the right tools to sharpen it up again.
Start with a longer bastard file (somewhere around 12 inches is what I prefer). Bastard files get their name because they aren’t coarse and they aren’t fine, they’re somewhere in between.
A set of 3 files (fine, bastard, and coarse) is all you will really ever need if you get a quality set with a decent handle. Just buy a decent set so you don’t have to buy them over and over again!
Pick up a file card as well (although any wire brush will work) to clean out the material that builds up in the file.
You’re going to clamp the axe down in a vise, if you have one, with the blade pointing up. Feel the sides of the cutting edge for any nicks, dents or chips. You’re going to be removing these with the file.
Then start filing along the edge at an angle that is correct for your axe. Don’t get too crazy about worrying about the angle. You just want to make sure you have a narrower edge for a cutting axe and a wider edge for a splitting axe.
You want to do the same number of strokes on each side of the axe. I like to make about 4 or 5 passes on one side then the same number on the opposite side. Keep going back and forth on each side until you get all of the nicks and dings out of the blade.
At this point, you should have a fairly sharp and perfectly useable axe, but in order to get a very sharp edge, you need to take it one step further.
For this step, you’re going to start smoothing the edge with a sharpening puck. You can use a traditional rectangular sharpening stone, but the puck shape makes it easier to sharpen larger tools like axes.
A sharpening puck also fits into a backpack really easily so you don’t have to resort to the methods that were going to discuss later on!
With the axe still clamped into your vise, line the coarse side of the puck up along the blade at the same angle that you’ve been using your file and start going back and forth along the blade in circular motions. Again, you want to do this an equal number of times on each side.
I like to make 4 or 5 passes with the coarse side of the puck, then switch to the other side. I do this a total of 3 times then switch to the fine side of the puck and repeat the process again.
That’s all there is to it. Don’t get too crazy worrying about the perfect angle, just get the feel for it and you’ll be good to go.
Improvised Axe Sharpening Techniques
Let’s be honest, just because you can do something, doesn’t mean that you should. Some of these tool less sharpening techniques fall into that category. These are listed roughly in the order of usefulness.
Sharpen Your Axe with a Leatherman or Gerber
I really like this because it’s almost as effective as properly sharpening your axe at home and most people never think of it.
Yes, I know it’s cheating a little bit because a multi-tool is obviously a tool, but it’s something that so few people discuss, and it’s really effective so I had to mention it.
If you have a multitool with a file in it, you’re good to go! Simply open it up, secure that axe as best as you can, and file the edge in the same way as you would if you were at home sharpening the axe.
It’s so completely obvious but a lot of people never think about using the file they probably already have with them.
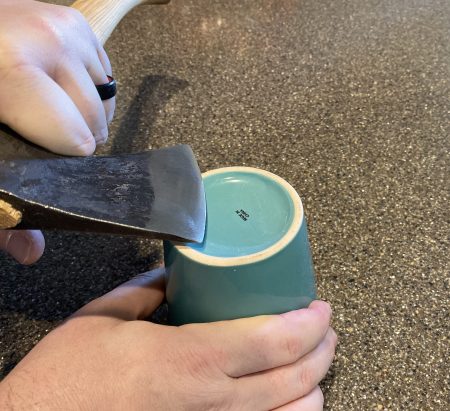
Base of a Ceramic Coffee Cup
It’s no secret that ceramic is a good material to sharpen all kinds of blades on, but most people overlook the simple things made of ceramic that are all around them. One of these is a coffee cup.
If you flip your coffee cup over, you’ll probably notice that the very bottom ring that touches the table isn’t glazed like the rest of it. This ring of exposed ceramic can be used to sharpen your axe really well.
Just line up the blade at the correct angle and draw it across the ceramic. You can also do small circles up and down the blade. Keep alternating back and forth on both sides to get the axe as sharp as you want it.
You can do the same thing with other ceramic objects around the house. The bottom of a ceramic plate works just as well. So does the back of a ceramic tile and the bottom of the cover on your toilet!
Sharpen an Axe on a Rock
Sharpening an axe on a rock shouldn’t seem like too much of a stretch to anyone. The abrasiveness of the rock will determine how much material is removed from the axe blade as you sharpen it and the shape of the rock will determine how easy it is for you to get a good edge.
Certain types of sandstone, slate, and shale create really flat surfaces when they’re broken. River rocks can also be great for sharpening an axe since they’re usually smooth from the water and rolling around against other rocks.
If you don’t have access to any of those, then you may need to do a little work on the rock itself before you use it to sharpen your axe. Just rubbing two rocks together can give you a surface that’s flat enough to sharpen on.
Larger, flat pieces of rock (like slate) can be put on the ground and used the same way that you’d use a sharpening stone. Smaller river rocks can be used the same way that you’d use a sharpening puck.
Sharpen an Axe on Concrete
You can sharpen an axe on concrete in pretty much the same way that you’d use a sharpening stone.
Concrete normally has the advantage of being flat so you can get the angle of your blade pretty uniform.
You can find concrete of varying coarseness, but even the smoothest concrete will be very course compared to a traditional sharpening stone. Concrete curbs are usually pretty smooth and uniform but steps and sidewalks work as well.
Start by holding your axe in both hands and lining it up so the blade meets the concrete at the correct angle for your blade. Then use small, gentle circular motions to sharpen the entire length of the blade. Repeat on the other side.
I suggest doing only one pass on each side and then seeing if your axe is sharp enough for you. You can do a lot of damage to an axe by rubbing it on concrete so go slow, be gentle and check the blade often.
Sharpen an Axe on a Car Window
Sharpening an axe on a car window is done similarly to how you’d sharpen an axe on sharpening stone.
Hold the axe firmly in both hands, angle the head of the axe so it rests on the top of your car window at the angle you want to sharpen the blade at and slide it away from you, sharpening the entire blade as you go. Count the number of times that you do this and repeat the same number of times on the opposite side of the axe.
A car window is a very fine surface, so you could be here for a while if you’re trying to sharpen a very dull blade. This technique would be a good way to finish a sharpening job that you started using one of the other, coarser improvised methods of sharpening.
Use a Broken Glass Bottle to Sharpen Your Axe
Using a broken piece of glass to sharpen your axe may not seem like a good idea, but if it’s all that you have around, it can work! You actually don’t need to break the bottle at all, the key is to find a piece of glass that isn’t polished. The lid of bottles sometimes isn’t polished, so that’s a good place to start if you’re trying to find unpolished glass without having to break anything.
Hold the axe with one hand and the glass with the other. Lay the blade of the axe against the glass and gently slide it along the edge of the glass to remove some material.
Keep alternating on opposite sides of the axe until your blade is sharp again.
This doesn’t remove a lot of material on each pass so it’s going to take a while to get a good edge on your axe if it’s damaged at all. If this is the case, you’re better off starting with one of the other ways to sharpen an axe and then finish the process off with your glass.
Emery Board
Emery boards and nail files can be used to sharpen an axe too. You can sometimes find them in first aid kits but they’re most often found in manicure sets.
You can either lay the emery board on a flat surface or hold it in your hand. I prefer to lay it on a flat surface because it gives me better control over the axe head.
Then it’s just a simple matter of running the blade down the emery board over and over until it’s nice and sharp. Make sure that you do an equal number of passes on each side.
Some emery boards have a coarse and a fine side. If you have one of these, start on the coarse side and then finish sharpening on the fine side.
Sandpaper can be used in the same way. It’s best to glue to the sandpaper to a wooden block so you don’t have to worry about it moving. Then, when it’s glued down, you can sharpen your axe without a problem.
A lot of people actually prefer to use sandpaper over other means even when they have access to tools.
Sharpen an Axe on the Spine of a Knife
The spine of a knife can be used to realign the edge on your axe. This can’t repair damage to the axe like other sharpening methods but it does help perfect the edge from those methods.
Start with a knife with a good square spine if you have one. Then drag the blade across the spine like you would when you sharpen your axe using any other method.
If this doesn’t give you the edge that you’re looking for, start with a coarser sharpening method and then come back to use your knife to finish the edge.
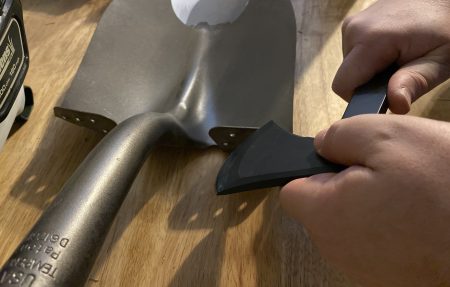
Use a Shovel to Sharpen Your Axe
This works in the same way as sharpening on the spine of a knife.
Use any of the edges on the shovel to realign the edge of your axe or finish the sharpening from another improvised method. This may actually be a little more productive than trying to use the spine of a knife because you have more area to work with on the shovel.
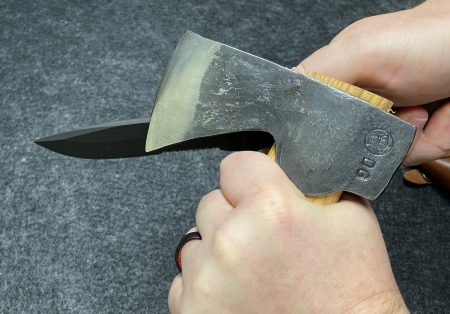
Use the Poll of another Axe to Sharpen Your Axe
Again, this is more of a finishing technique than a good way to sharpen an axe from scratch. It can bring your axe back if it’s not too damaged but if it’s not going to get those chips and nicks out of the blade.
With this technique, you’re just going to run the blade of the axe down the back of another axe to help align the edge and smooth out some of the roughness from other sharpening methods.
Strop it with a Leather or Nylon Belt
Before your axe gets too dull and damaged, you can bring it back by stropping it with a leather or nylon belt.
To pull this off, all you need to do is secure your belt on one end and hold the other end with your hand. Then position the blade over the belt at an angle that matches the angle you’re aiming for with the blade facing away from your body. Finally, pull the axe head back toward you and repeat on both sides.
This is the perfect way to finish the blade after sharpening it with another method.
Improvised Sharpening Stone
This trick uses quartz, although you could probably use any rock that is easily smashed into a fine powder, and a piece of live wood. You can also use sand instead of smashing a stone into powder.
To start sharpening an axe this way, you’ll need to find a soft rock to smash into a fine powder. Quartz is what most people recommend since it’s easy to smash it into a powder. You can sometimes find quartz in river beds.
I’d rather just use sand since it’s a lot easier to find than quartz…
After you smash the rock, remove any large chunks and save the finer powder.
Then, strip the bark off of the live piece of wood that you chose. This should leave you with the exposed wood underneath.
Wet the wood and coat it in the crushed quartz or sand. This is going to give you a surface that you can draw the axe across to get a sharper edge.
This is probably the least effective method out of all of the methods outlined here, so I’d use it only as a last, last resort!
Getting a Perfectly Sharp Axe with These Techniques
Step One – Start by sharpening the blade with a multitool, a ceramic coffee cup, a smooth rock or on concrete. This will define the edge of the blade, remove most of the material that needs to be removed to make it sharp and remove large nicks or damage.
Step Two – The sharpening techniques in the first step are pretty rough and can leave a lot of scratches and imperfections in the edge of the axe blade. So now you’re going to smooth those out.
Use the car window technique, broken glass or emery board to act as a finer grit sharpening tool. These will remove the larger scratches left behind by the first round of sharpening and they’ll further sharpen the edge.
Step Three – Now it’s time to get the cutting edge of your axe as smooth as you can considering the tools that you’re using. In this step, use the spine of a knife, the poll of an axe, a shovel, or a leather belt to smooth out the edge of your blade and give it some finishing touches.
If you’re still not happy with the edge, you can go back to step two (or even step one) to rework the edge and try again.