Learning how to stop bleeding is one of those things that can overwhelm people. All kinds of acronyms and other memory joggers try to help you remember what you’re supposed to do. I have difficulty remembering things like that under normal conditions, let alone in a high-stress situation!
In this article, I will talk about how to control bleeding and why it is the first thing you should do when treating trauma. I’m also going to explain why you do what you do. If you know why you do something, you don’t have to memorize a checklist or an acronym that you will most likely forget in the heat of the moment.
A long time ago, I was said something by a Special Forces medic that has stuck with me to this day, “Put your hands on the red.” This simple phrase has gone through my head every time I’ve had to work on someone bleeding uncontrollably (mostly blast-related traumatic amputations).
If you’re interested in learning how to close wounds with steri-strips, this article will help!
It’s simple, easy to remember, and easy to implement. It also does something else…it gets you doing something. Just starting to act can often get you past that initial shock and get you into the fight.
Why do you treat blood loss first?
The circulatory system functions like a hydraulic system. The pressure drops if there isn’t enough fluid in the system. The pump must work harder to move fluid through the system as the pressure drops.
Finally, the pump can’t move the fluid through the system any longer. This is why you stop severe blood loss first and as fast as you can. If your patient loses too much blood, it doesn’t matter if the person is breathing.
How do you stop bleeding?
You should take the time to put on a pair of surgical gloves if you have them available. This is for your protection against any bloodborne diseases your patient may have. Yes, it will also stop some wound contamination and prevent infection, but this is secondary.
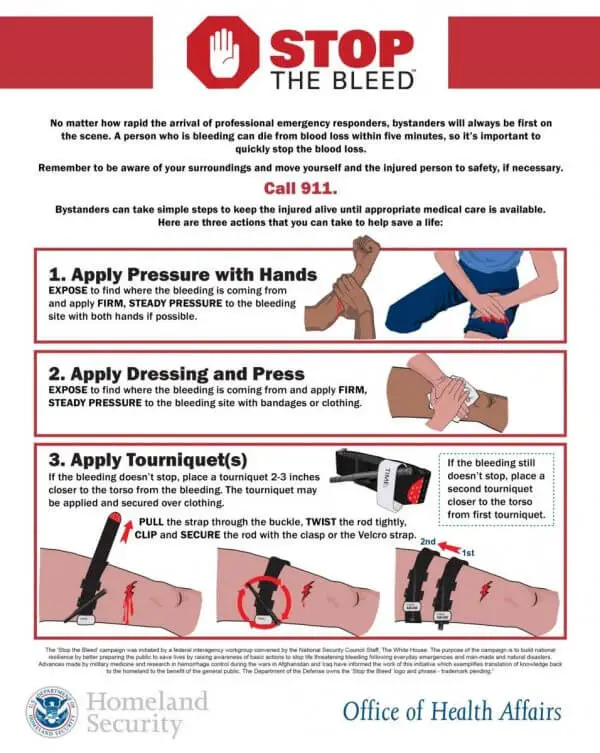
This article is mainly focused on stopping bleeding from severe wounds. Applying direct pressure is the best option when dealing with a smaller, manageable wound.
Apply a bandage to the area, put pressure on the wound with your hand or use a pressure dressing (like an Israeli bandage) and elevate the wound above the heart if possible. This reduces the blood flow to the area and assists in stopping the bleeding. If the bleeding does not stop, you must apply a tourniquet or a hemostatic-impregnated dressing (discussed below).
When do you apply a tourniquet?
Apply a tourniquet for amputations and wounds on appendages that are gushing blood.
Place the tourniquet 2-3 inches above the wound and tighten it until the flow of blood stops. Our goal here is to apply as much pressure as needed to stop the flow of blood.
With amputations, I have found that the right amount of pressure is how much it takes to stop the blood flow. When treating intact limbs, you should tighten the tourniquet until there is no pulse (taken at the wrist or the ankle).
Apply the tourniquet lower than the next joint up the appendage for amputations. For example, if someone has suffered an amputation mid-forearm, you would place the tourniquet below the elbow.
This increases the likelihood that the elbow, and the stump below it, can be saved, making fitting a prosthetic much easier. Do not sacrifice the efficient placement of the tourniquet!
Stay with the patient until they are handed off to a higher medical authority. Make sure to tell medical personnel a tourniquet was used, and the time it was applied. You should mark the patient with a “T” and the time you applied the tourniquet if you cannot stay with them (if you need help).
Never cover a tourniquet! The intent here is to ensure that it is obvious that a tourniquet was applied. You don’t want your patient to get to a hospital and wait for hours with a tourniquet.
Take some time to practice this on yourself.
Apply a tourniquet to your arm or leg and tighten it until you cannot feel a pulse. This will give you an idea of exactly how much pressure it will take to stop the bleeding on others. It will also teach you how to apply a tourniquet to yourself if you ever get injured while on your own.
Isn’t a tourniquet only used as a last resort?
Anyone who has served in the military since the Iraq War has probably already been taught this. I was surprised that there is still so much debate about the application of tourniquets in the civilian world.
According to studies conducted in 2012, the early application of tourniquets to extremities during the wars in Iraq and Afghanistan saved between 1000 and 2000 lives. All with almost no record of long-term damage to this personnel.
Two hours is the generally accepted length of time that a tourniquet can be in place. Post-tourniquet syndrome is sometimes found in patients who have a tourniquet on for periods longer than 2 hours. The loss of feeling in the limb marks this syndrome. Patients normally regain full feeling in their limbs in 1-6 weeks.
Using a tourniquet on patients is a proven way to save lives. When you are more than 2 hours from a higher level of care, you should try to stop bleeding by applying direct pressure first. If this doesn’t work, do not hesitate to apply a tourniquet.
Types of Tourniquets
There is a wide variety of commercially available tourniquets for sale. I prefer the Combat Application Tourniquet, but others like the SOF Tactical Tourniquet. Both will do the job, and it comes down to personal preference. Practice is key regardless of the type of tourniquet you decide to carry.
One company, RevMed, makes a ratcheting, daily wear belt called the Parabelt that can act as a proper tourniquet. It seems like a decent option for everyday carry, but it may not be the best if you carry a pistol (and you should!).
You can always improvise a tourniquet if you have to. According to several EMS journals, a manual blood pressure cuff is one of the best-improvised tourniquets. I have never tried it, but it came up several times in my research.
Other improvised tourniquets can be made from a t-shirt, belt, rope, or another piece of material and a hard item that you can use as a windlass. Try to use a strip of material at least one inch wide.
The more narrow your tourniquet is, the more likely you are to cause damage to the tissue and nerves under the tourniquet. Begin by tying your improvised tourniquet around the limb, place your windlass on top of the knot and make another. Use the windlass to tighten the tourniquet and then secure the windlass in place.
What is a hemostatic dressing, and how do you use one to stop bleeding?
A hemostatic dressing is a bandage that is impregnated with a hemostatic agent. These agents accelerate the body’s natural clotting ability.
They were originally designed for the battlefield but are now used across the civilian world by hunters, hikers, mountain bikers, and the prepared. QuikClot Gauze and Celox Z-Fold Gauze are common examples of these dressings.
Hemostatic dressings excel when trying to stop bleeding from a wound in areas where it is hard to get direct pressure on an artery (like a wound high in the groin). They are also useful for deep penetrating wounds (such as a gunshot).
Large, wide bandages are best for more open wounds. Long, thin bandages are best used on penetrating wounds.
Pack the dressing into the wound, trying to cover the entire bleeding surface. You can use another hemostatic dressing or normal dressings to fill the wound cavity for very wide wounds.
Apply pressure to the wound by hand or by applying a pressure dressing. Packing the wound tight creates pressure to help form a clot and stop the bleeding.
Pressure Points
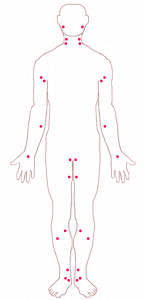
The picture to the right shows the location of pressure points that are useful when stopping bleeding. The two most common pressure points are over the brachial artery (high in the armpit) and femoral artery (high in the groin). To assist in stopping the bleeding from a wound, put pressure on the brachial artery for an arm wound and the femoral artery for a leg wound.
If you are working with a partner, have one person place pressure on the pressure point while the other treats the wound. If you are by yourself, you can use your knee to put pressure on the femoral artery so you can use both hands while treating the wound.
A good way to put pressure on the brachial artery is to place something into the armpit area, then use your leg to push the patient’s arm toward their body, putting pressure on the artery. You can even do this to yourself if needed. Place a balled-up towel or t-shirt in your armpit and place your body weight onto that arm.
If you use the carotid artery to slow bleeding to a head wound, do NOT put pressure on both sides! You will cut off blood flow to the brain and cause the patient to lose consciousness.
Conclusion
You are going to be nervous! This is normal, especially if you are treating a loved one. Take a deep breath and try to calm yourself.
Some amputations make it hard to tell if you’ve stopped the bleeding. This is especially true if you’re on a surface quickly absorbing the blood. Before you move to another patient, ensure that the blood flow has stopped.
Do something! Your actions can mean the difference between life and death.
I carry these three items: Adventure Medical Trauma Pak, Ever Ready Battle Dressing (AKA Israeli bandage), and Combat Application Tourniquet. For around $60, you can stop almost any type of bleeding. Together they make a kit that can fit in a large pocket or slide into a pack or purse.
This isn’t the end-all, be-all of trauma kits, but it is very robust for the size and cost. These are the same items we recommend that you include on your bug-out bag list.
As always, please get in touch with your local Red Cross for proper first-hand training. This article is as complete and current as we can make it, but it is not a substitute for first-hand training.
References
Journal of Emergency Medical Services. (2008, February 29). Use of Hemostatic Dressings in Civilian EMS. Retrieved from http://www.jems.com: http://www.jems.com/articles/print/volume-33/issue-3/training/use-hemostatic-dressings-civil.html
Sharma, J. P., & Salhotra, R. (2012). Tourniquets in Orthopedic Surgery. Indian Journal of Orthopedics, 377–383. Retrieved from www.ncbi.nlm.nih.gov: https://www.ncbi.nlm.nih.gov/pmc/articles/PMC3421924/
Sippel, Robert E., MS, MAEd, NREMT-P, LP. (2011, September 16). EMS Recap: Tourniquets. Retrieved from www.emsworld.com: http://www.emsworld.com/article/10364651/ems-recap-tourniquets
Bleeding Cuts or Wounds, https://www.webmd.com/first-aid/bleeding-cuts-wounds, reviewed by Dr. Sabrina Felson, MD