Are you a hunter who wants to make sure they use absolutely every bit of any animal they kill? Or, perhaps, you’re a prepper looking to find out how to make an adhesive in a grid down situation.
While modern chemistry has been able to bring us a wide variety of effective adhesives over the years, there’s still just something special about learning how to make animal glue. It’s as effective now as it was in the past!
Hide glue was, at one point in time, the go-to adhesive for any professional. Not only is it incredibly strong and durable, but it also dries completely transparent which makes it ideal for anyone building a home or a piece of furniture where you want things to be as clear and attractive as possible.
However, over the decades, people lost their enthusiasm for this incredible material in favor of the more modern chemical-based glues that many companies were pushing out.
Luckily, in recent years, the respect and admiration for animal glue has returned, leading many people to wonder whether or not they can make this amazing adhesive right in their own home kitchen. The answer to that question is, yes you can.
In fact, the process for making hide glue is incredibly simple once you get the hang of things. Here are all the steps you’ll need to take to make your very own animal hide adhesive right away.
Trim and Cut
The first thing you’ll need to do is take any leftover hide you might have lying about and trim it so that there are no other materials getting into the mixture at any point. Having hair or meat particles getting into your glue could not only affect the quality of the final product, but it’s just not something you really want to see in your adhesive.
Once the hide has been completely trimmed, you’ll want to cut it into small pieces. The smaller the hide is cut, the easier and faster the process becomes, and so if you’re someone who traditionally tans hides, make sure you save all those smaller throwaway bits that you normally discard.
Throw it in a Pot
After the hide has been cut up, you’ll now want to find a lower quality pot to place it in. Keep in mind, this process is most likely going to do a number to whatever pan you throw it in, and so you probably don’t want to use a pot you still cook in fairly often. Instead, find a pot that’s already on its last legs and ready to be thrown away so that you don’t end up ruining something you love.
Once all your hide is in the pot, cover it all up with water and let the hide sit for a few minutes to absorb as much as it can. Once it’s absorbed a bit, you’ll need to decide where you’re going to bring this mixture up to a boil.
If you have an outdoor heating source such as a barbecue or fire pit, you’ll probably want to do this there. If not, and if you have to use the stove in your kitchen, you’ll definitely want to make sure you stop and pick up a few scented candles or deodorizers on the way home because this process can produce strong odors as it progresses.
Once the mixture starts boiling, take the heat level down to a simmer and let it go. The simmering process itself can actually take a few hours, depending on how many hides you’ve used. The exact timing can’t be given, but you’ll know when the process is done when the hides themselves have turned a somewhat translucent color.
Remove the Hides
After the mixture has cooled slightly, you can start removing the hides from the glue. The easiest way to do this is with a kitchen strainer. However, just like with the pot, make sure you use one that you wouldn’t usually use in the kitchen or pick up an inexpensive one on the way home, as it will be ruined for food after you’re done.
Make sure you pick out every single bit of hide since you don’t want to have any other material in the glue once you’re done.
Return to Heat
At this point, you’ll need to return your mixture to your preferred heat source and continue to remove all the excess water that still remains. Once your glue starts to thicken, remove it from the heat and let it cool completely. You can test whether or not the glue has really come together by touching the top of your mixture with your finger and feeling whether or not there’s a stickiness to it.
Strain and Congeal
Once you’re sure that the mixture has completely cooled, you’ll want to take something like a cheesecloth to remove all the smaller particles that you weren’t able to strain out with your standard kitchen strainer.
This will be an incredibly important step, as you want your glue to be as clear and smooth as possible. A strainer is easy to find at any local kitchen supply shop and it’s definitely worth the stop.
Make sure you strain the liquid adhesive into a flat container such as a foil pie plate and allow it to continue cooling off and eventually congeal. Once the process is complete, your glue will feel somewhat like rubber.
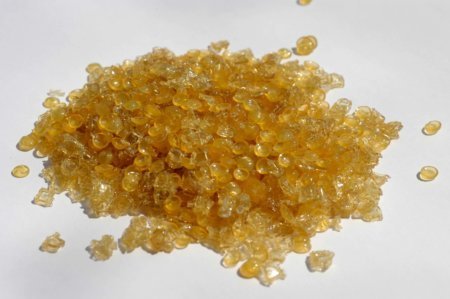
Break it Up
Once the mixture has congealed, you can now break it apart into small pieces either using your fingers or a knife. At this point, you’ll need to store it in a cool, dry area in the house such as your garage or a basement. Return every day to continue breaking the bits apart into smaller pieces until your crumbles are completely dry.
Once that happens, you’ll be able to store your glue bits in an airtight container for safe storage until you’re ready to use it. When you are, simply take some of the glue and slowly heat it up, adding a very small amount of water until it reaches the consistency you’re looking for.
It’s really just that simple. Being able to make your own animal glue at home can be a great way to use your leftover hide and have a product on hand that you can be sure will work for years to come.