Knowing how to build a clay pot heater is a great skill that can help you stay warm and heat a room in your house when you lose power. This is a wonderful survival skill since it is easy for most people to accomplish and can be used to heat a small area with very minimal supplies.
Following these steps will ensure that you know how to make a clay pot heater and that you have the best results with it keeping you warm during cold weather.
Gather Your Ingredients
There are a few things that you will need to have on hand to make a clay pot heater, so it’s a good idea to gather them before getting started. The number and size of clay pots that you choose will determine how large your heater is and how much heat it can produce.
Amazon has a lot of cheap clay pots that are great for this project.
For a larger heater that will easily heat more space in your home, choose three terracotta clay pots that are 8”, 10”, and 12”. Make sure that they all have a drainage hole in the bottom and that they don’t have any glazing or painted designs on the outside.
For a smaller setup, you will only need to have pots that are 6”, 8”, and 10”. They also need to have drainage holes, no painting, and also can’t be cracked.
Additionally, you need to have a threaded bolt that is about 6” long and that will easily fit through the drainage holes in the pots. Other items include 8 to 10 nuts, 6 large washers, a metal baking pan, 2 bricks, and a candle.
Threading the Pots
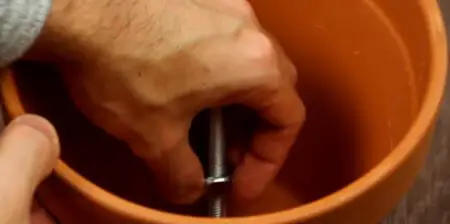
Correctly threading the pots is important, as you need to make sure that there is ample space between the pots to allow airflow to move easily between them. Start with the largest pot, and insert the bolt from the bottom outside of the pot, allowing it to stick up the middle.
Use a washer and nut on the outside to hold it in place and put another washer and two nuts on the inside. Tighten them so that they are firm, but do not crack the pot.
Add a washer on top of the nuts and then carefully slide the second pot to nest inside the first. Add another washer and two more nuts to the bolt. Put a washer on top of the nuts and then carefully slide the third pot onto the bolt. Add a washer and between three to four nuts, depending on how much space you have left on the bolt.
It’s important to put as many nuts as possible on the bolt after the third pot. These nuts will help to conduct the heat that the candle releases, allowing more heat to be released through the heater.
Prepare the Heater
Once all of the pots have been carefully bolted together, then you can set up the rest of the heater. Put the three pots to the side at this time so that you can design your heater and make sure that it is set up correctly.
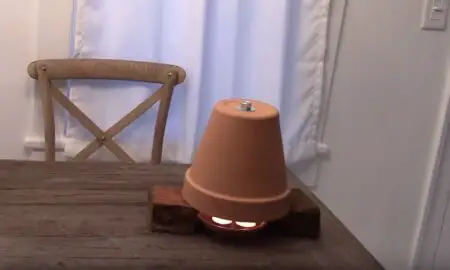
Place two bricks inside the metal baking sheet, a few inches apart from each other. These bricks will be used to hold the flower pots up and away from the candle.
After the bricks are in place, then you can put the candle between them and light it. After the candle has been lit, it’s time to carefully place the pots so that they are resting on the bricks. This allows the heat from the candle to rise into the pots, where it will be transferred to the rest of the room.
Make Adjustments
It’s very common to have to make some adjustments to this clay pot heater to ensure that it is working the best that it can. Adjusting the height of the candle is the fastest way to adjust the heater and to ensure that you are getting enough heat in your home.
If the candle is too far away from the pots, then it will take a long time to heat them up. It can be put on top of a small rock or small can to raise it up and put it closer to the pots. However, putting it too close to the pots can cause them to get too hot and will increase the possibility of them exploding.
If the pots are incredibly hot and you are worried about their structural safety, then simply lower the candle so that it is not so close to the pots. This will cause the entire heater to cool down a little bit.
Making a clay pot heater is not only an inexpensive and easy way to stay warm when you have lost power, but it is also a lot of fun. As long as you have the few simple items on hand that you need to create this heater, you can easily heat a small space without worrying about the dangers of a larger fire in your home.